
学習目標
この回が終わる頃には、以下のことができるようになります:
- 画像ファイルをTeX文書に挿入できる
- 画像のサイズや位置を調整できる
- figure環境を使って画像を適切に管理できる
- 画像にキャプションを付けて参照できる
1. 前回の復習
数式入力の確認
\documentclass[uplatex]{jsarticle}
\usepackage[utf8]{inputenc}
\usepackage{amsmath,amssymb}

\begin{document}

\section{数式の復習}

% Inline math
ピタゴラスの定理:$a^2 + b^2 = c^2$

% Display math
\[
\int_{-\infty}^{\infty} e^{-x^2} dx = \sqrt{\pi}
\]

% Multiple line equations
\begin{align*}
\sin^2 \theta + \cos^2 \theta &= 1 \\
\tan \theta &= \frac{\sin \theta}{\cos \theta}
\end{align*}

\end{document}
2. graphicxパッケージの導入
画像を挿入するためには、graphicxパッケージを使用します。プリアンプル部に\usepackage[dvipdfmx]{graphicx}と記入します。このパッケージにより:
- 様々な形式の画像ファイルが挿入可能
- 画像のサイズ調整、回転、拡大縮小が可能
- 高品質なレイアウトが実現
対応画像フォーマット
CloudTeXで使用可能な主な画像形式:
- PNG:透明背景対応、図表に最適
- JPG/JPEG:写真に最適、ファイルサイズが小さい
- PDF:ベクター画像、拡大縮小しても高品質
- EPS:ベクター画像(主にLaTeX環境で使用)
推奨:
- 図表・グラフ:PNG形式
- 写真:JPG形式
- ベクター画像:PDF形式
プリアンブルに以下を追加します:
\documentclass[uplatex]{jsarticle}
\usepackage[utf8]{inputenc}
\usepackage{amsmath,amssymb}
\usepackage[dvipdfmx]{graphicx} % Image insertion package

\begin{document}
% Document with images
\end{document}
重要:今後の画像例では、常にgraphicxパッケージが読み込まれているものとします。
3. 基本的な画像挿入
単純な画像挿入
画像ファイルはtexファイルと同じフォルダに配置します。texファイルがこの画像を自動的に読み込み、pdf文書のなかにあなたの指示通りに配置します。
\documentclass[uplatex]{jsarticle}
\usepackage[utf8]{inputenc}
\usepackage{amsmath,amssymb}
\usepackage[dvipdfmx]{graphicx}

\title{画像挿入の基本}
\author{山田花子}
\date{\today}

\begin{document}

\maketitle

\section{基本的な画像挿入}

以下は簡単な画像の例です:

\includegraphics{sample.jpg}

画像の後に文章を続けることができます。

\end{document}
画像サイズの調整
\documentclass[uplatex]{jsarticle}
\usepackage[utf8]{inputenc}
\usepackage{amsmath,amssymb}
\usepackage[dvipdfmx]{graphicx}

\begin{document}

\section{画像サイズの調整}

% Original size
\includegraphics{sample.jpg}

% Scale to 50%
\includegraphics[scale=0.5]{sample.jpg}

% Set width
\includegraphics[width=5cm]{sample.jpg}

% Set height
\includegraphics[height=3cm]{sample.jpg}

% Set width relative to text width
\includegraphics[width=0.8\textwidth]{sample.jpg}

\end{document}
サイズ調整オプション:
scale=0.5:元のサイズの50%に縮小width=5cm:幅を5cmに設定height=3cm:高さを3cmに設定width=0.8\textwidth:テキスト幅の80%に設定
4. figure環境による図の管理
TeXはページ構成などを自動的に行います。読み込まれた画像について、ページのどのあたりに配置するのかをfigure環境で指定することができます。
基本的なfigure環境
\documentclass[uplatex]{jsarticle}
\usepackage[utf8]{inputenc}
\usepackage{amsmath,amssymb}
\usepackage[dvipdfmx]{graphicx}

\title{図の管理}
\author{山田花子}
\date{\today}

\begin{document}

\maketitle

\section{figure環境の使用}

図\ref{fig:sample}に示すように、figure環境を使用することで
画像を適切に管理できます。

\begin{figure}[h]
\centering
\includegraphics[width=0.6\textwidth]{sample.jpg}
\caption{サンプル画像}
\label{fig:sample}
\end{figure}

この方法により、図番号の自動管理と参照が可能になります。

\end{document}
figure環境の要素
環境の構成:
\begin{figure}[位置指定]
\centering                    % Center alignment
\includegraphics[options]{filename}
\caption{図のキャプション}    % Caption
\label{fig:ラベル名}         % Label for reference
\end{figure}
位置指定オプション:
[h]:ここに配置(here)[t]:ページ上部(top)[b]:ページ下部(bottom)[p]:独立したページ(page)[H]:強制的にここに配置(float packageが必要)
5. 画像の参照システム
学術論文では複数の図が用いられます。それぞれの図に番号を自動で割り当てることができます。それぞれの図に\labelをつけて、本文中で\refを使って\labelを参照することで当該の図の番号を呼び出すことができます。また、図の説明のためのキャプションを付けることができます。
ラベルと参照の仕組み
\documentclass[uplatex]{jsarticle}
\usepackage[utf8]{inputenc}
\usepackage{amsmath,amssymb}
\usepackage[dvipdfmx]{graphicx}
\title{画像参照システム}
\author{山田花子}
\date{\today}
\begin{document}
\maketitle
\section{はじめに}
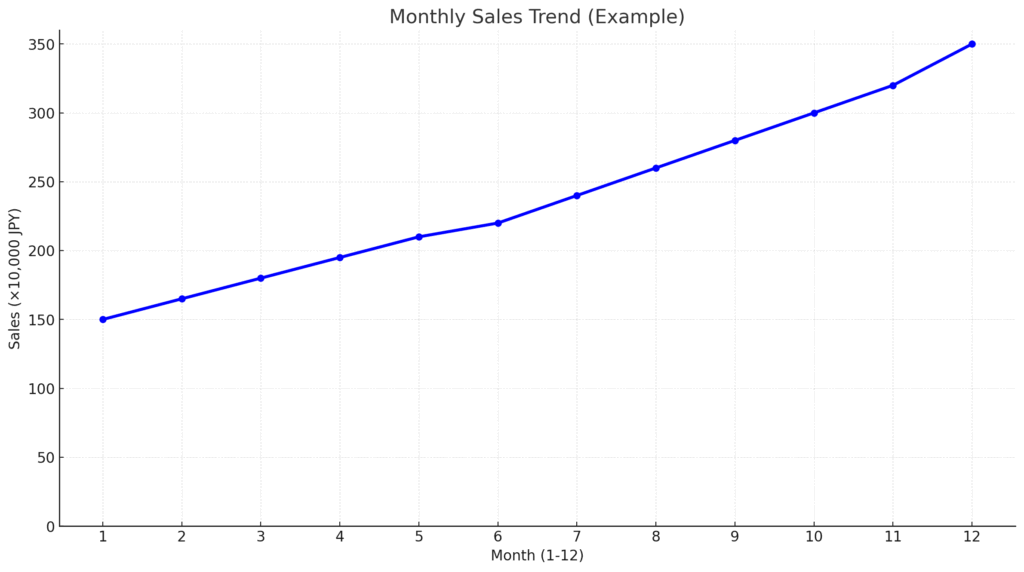
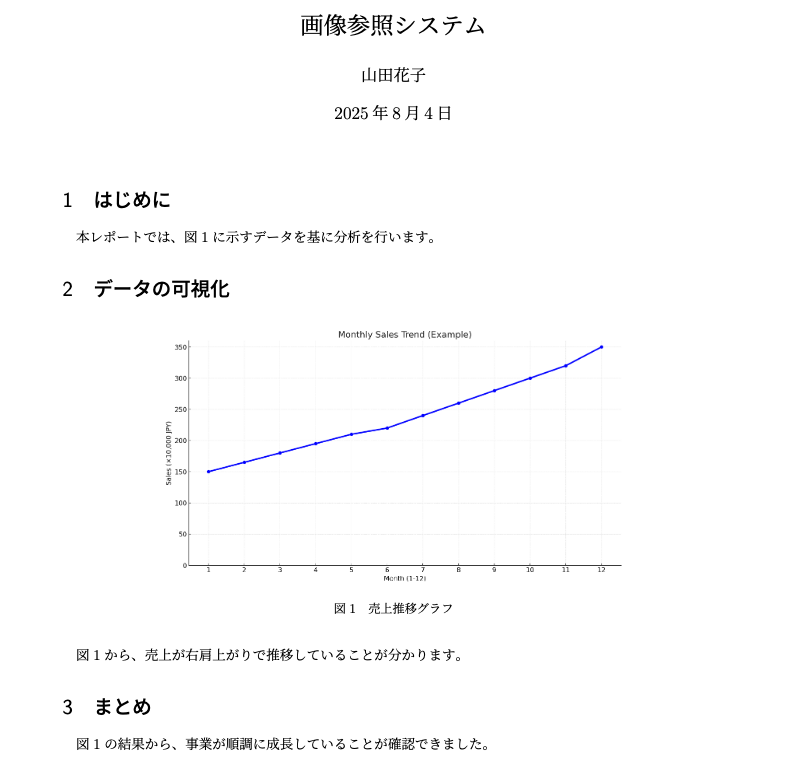
本レポートでは、図\ref{graph001}に示すデータを基に分析を行います。
\section{データの可視化}
\begin{figure}[h]
\centering
\includegraphics[width=0.7\textwidth]{graph.png}
\caption{売上推移グラフ}
\label{graph001}
\end{figure}
図\ref{graph001}から、売上が右肩上がりで推移していることが分かります。
\section{まとめ}
図\ref{graph001}の結果から、事業が順調に成長していることが確認できました。
\end{document}
参照システムの利点:
- 図番号の自動管理
- 図の移動時も参照が自動更新
- 読みやすい文書構造
6. 実践的な画像文書
科学レポートの例
 |  |
\documentclass[uplatex]{jsarticle}
\usepackage[utf8]{inputenc}
\usepackage{amsmath}
\usepackage[dvipdfmx]{graphicx}
\usepackage{amssymb}
\title{物理実験レポート:振り子の周期}
\author{山田花子}
\date{\today}
\begin{document}
\maketitle
\section{実験目的}
振り子の周期$T$と長さ$l$の関係を調べ、重力加速度$g$を求める。
\section{理論}
振り子の周期は以下の式で表される:
\[
T = 2\pi\sqrt{\frac{l}{g}}
\]
ここで、$T$は周期[s]、$l$は振り子の長さ[m]、$g$は重力加速度[m/s²]である。
\section{実験方法}
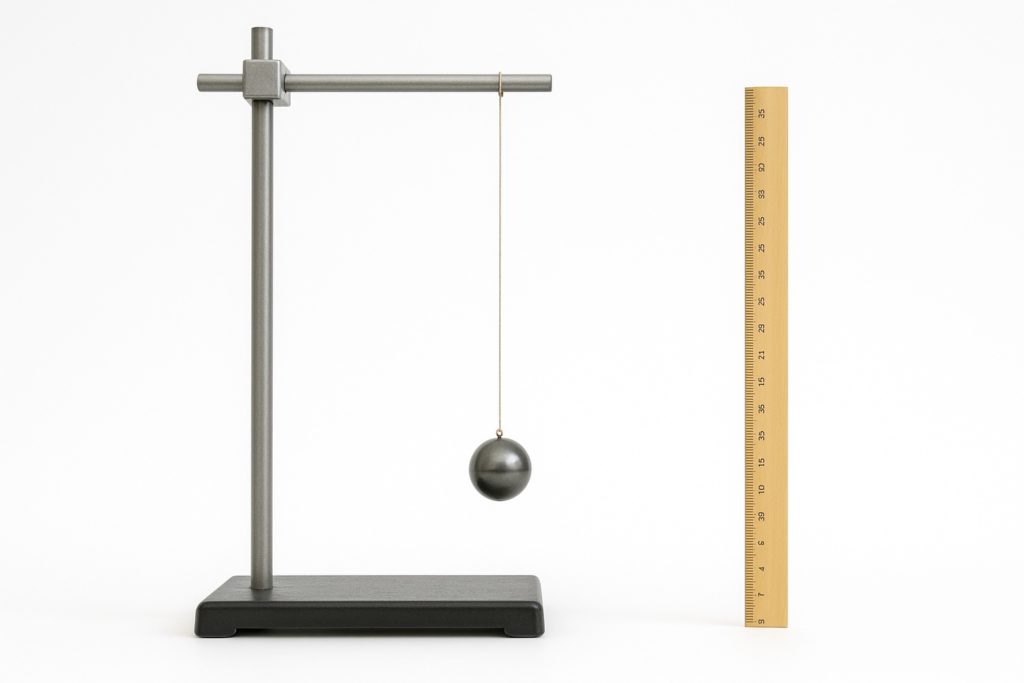
図\ref{fig:setup}に実験装置を示す。
\begin{figure}[h]
\centering
\includegraphics[width=0.5\textwidth]{pendulum.jpg}
\caption{振り子実験装置}
\label{fig:setup}
\end{figure}
\section{実験結果}
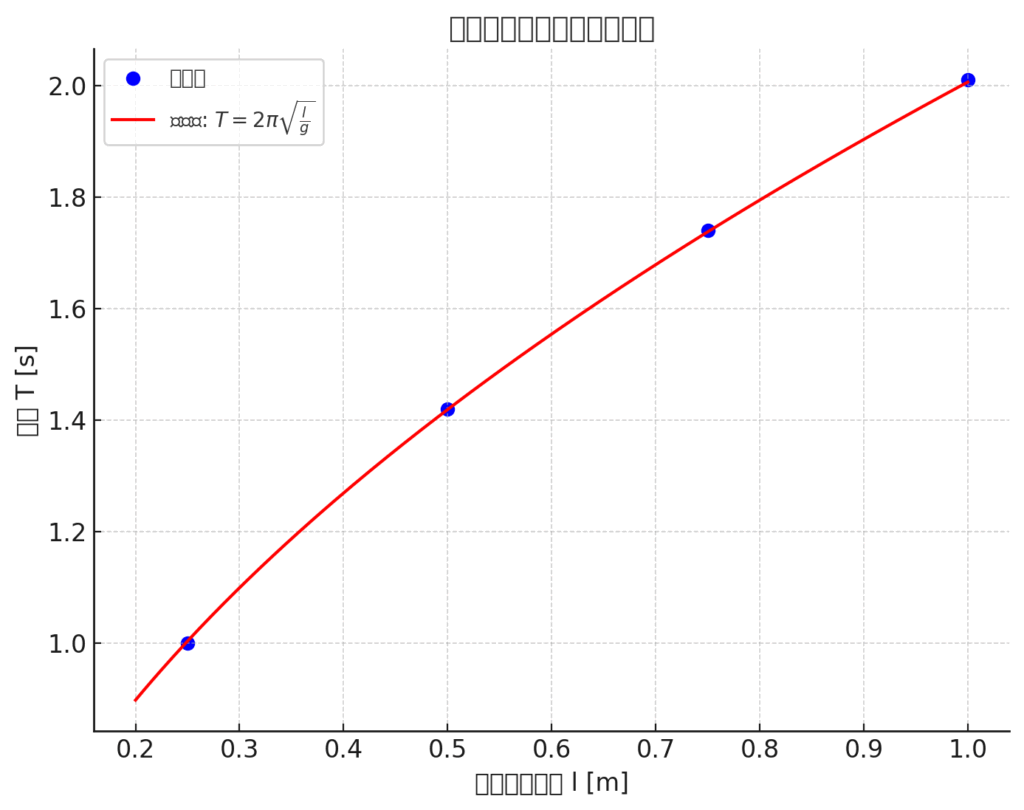
図\ref{fig:results}に測定結果のグラフを示す。
\begin{figure}[h]
\centering
\includegraphics[width=0.8\textwidth]{pendulum_graph.png}
\caption{振り子の長さと周期の関係}
\label{fig:results}
\end{figure}
\section{考察}
図\ref{fig:results}より、振り子の周期は長さの平方根に比例することが確認できた。
実験結果から求めた重力加速度は約$9.77 \, \text{m/s}^2$となり、
理論値$9.8 \, \text{m/s}^2$とよく一致している。
\section{結論}
振り子実験により重力加速度を精度よく測定できることを確認した。
図\ref{fig:setup}の装置構成で十分な精度が得られることが分かった。
\end{document}
7. 実習課題
課題:画像を含む文書の作成
第2回の宿題で作成したTOKレポートに画像を追加してください。
追加する要素:
- TOKポスターの画像
- figure環境を使用
- 適切なサイズ調整(
width=0.8\textwidth程度) - キャプション「TOK発表ポスター」
- ラベル
fig:poster
- 関連する画像(以下から1つ以上選択)
- 知識に関するイメージ図
- TOKの概念図
- 参考資料の画像
- 文中での参照
- 「図\ref{fig:poster}に示すポスターでは…」
- 画像を参照しながら論述を展開
文書構成例:
\documentclass[uplatex]{jsarticle}
\usepackage[utf8]{inputenc}
\usepackage{amsmath,amssymb}
\usepackage[dvipdfmx]{graphicx}

\title{TOK: 知識の本質について}
\author{あなたの名前}
\date{\today}

\begin{document}

\maketitle

\section{はじめに}
図\ref{fig:poster}に示すポスターについて論じる...

\begin{figure}[h]
\centering
\includegraphics[width=0.8\textwidth]{tok_poster.jpg}
\caption{TOK発表ポスター}
\label{fig:poster}
\end{figure}

\section{主張1}
図\ref{fig:poster}の左側に示された第1の主張は...

\section{主張2}
ポスターの中央部分(図\ref{fig:poster}参照)では...

\section{主張3}
図\ref{fig:poster}の右側の議論によると...

\section{まとめ}
図\ref{fig:poster}で示した3つの主張を総合すると...

\end{document}
注意事項:
- 画像ファイルが準備できない場合は、適当な名前でincludegraphicsコマンドを記載
- コメントでどのような画像を想定しているかを明記
- 例:
\includegraphics[width=0.8\textwidth]{tok_poster.jpg} % TOKポスターの写真
8. よくあるエラーと対処法
エラー1:画像ファイルが見つからない
症状:File 'image.jpg' not found 対処法:
- ファイル名のスペルを確認
- ファイルがプロジェクト内にアップロードされているか確認
- ファイル拡張子が正しいか確認
エラー2:参照が未定義
症状:Reference 'fig:sample' on page 1 undefined 対処法:
\label{}と\ref{}のラベル名が一致しているか確認- 2回コンパイルを実行(1回目でラベル作成、2回目で参照解決)
エラー3:図が期待した位置に表示されない
症状:図が文書の最後に移動してしまう 対処法:
- 位置指定オプション
[h]や[H]を使用 [H]を使う場合は\usepackage{float}が必要
9. 今日のまとめ
今日学んだこと:
- graphicxパッケージ:画像挿入のための必須パッケージ
- includegraphics:画像挿入とサイズ調整
- figure環境:画像の管理とキャプション
- 参照システム:
\label{}と\ref{}による図の参照 - 位置指定:図の配置オプション(h, t, b, p)
次回予告:表(table)の作成(tabular環境、table環境、セルの結合)を学びます。
コメント